W7HEN – D-Star TekNet
Welcome to the W7HEN D-Star TekNet basic Overview of registering and using D-Star. This page will co-inside with the information being given on the air on Sunday Night November 17th 2019. This page will be left in place for future reference and updated with information as needed. Each of the pictures below represents a page that is also a link directly to the page that is shown and explained. If anyone has any questions please contact me directly no7e@arrl.net . DV mode was discussed at the tech breakfast this past Tuesday, this method is NOT a needed step for programming your radio for directly connecting to a repeater.
The addition of adding the U, I, E commands into a separate memory slot is ONLY needed if you are using a DVAP to connect to the system. The DVAP was created by Robin Cutshaw AA4RC. Robin has been a dedicated member of the D-Star system since it came to the US in the early 2000s. A DVAP is basically a radio and a Raspberry Pi that connects to your computer and uses the computer as the internet gateway.

Step One: Check to see if you are already registered:

If you are already registered the system will return a page with your call sign and what system you are registered on. Please note, that if your registration returns and “Approved” message then you need to go back to that system and complete your registration. If you need assistance with this please contact me I will walk you through the finishing steps. I can assist no matter what system you are registered with, the process is the same for all systems. If your registration is complete skip the next step.
Step two: Registering with W7HEN
Go to the W7HEN registration site listed below.
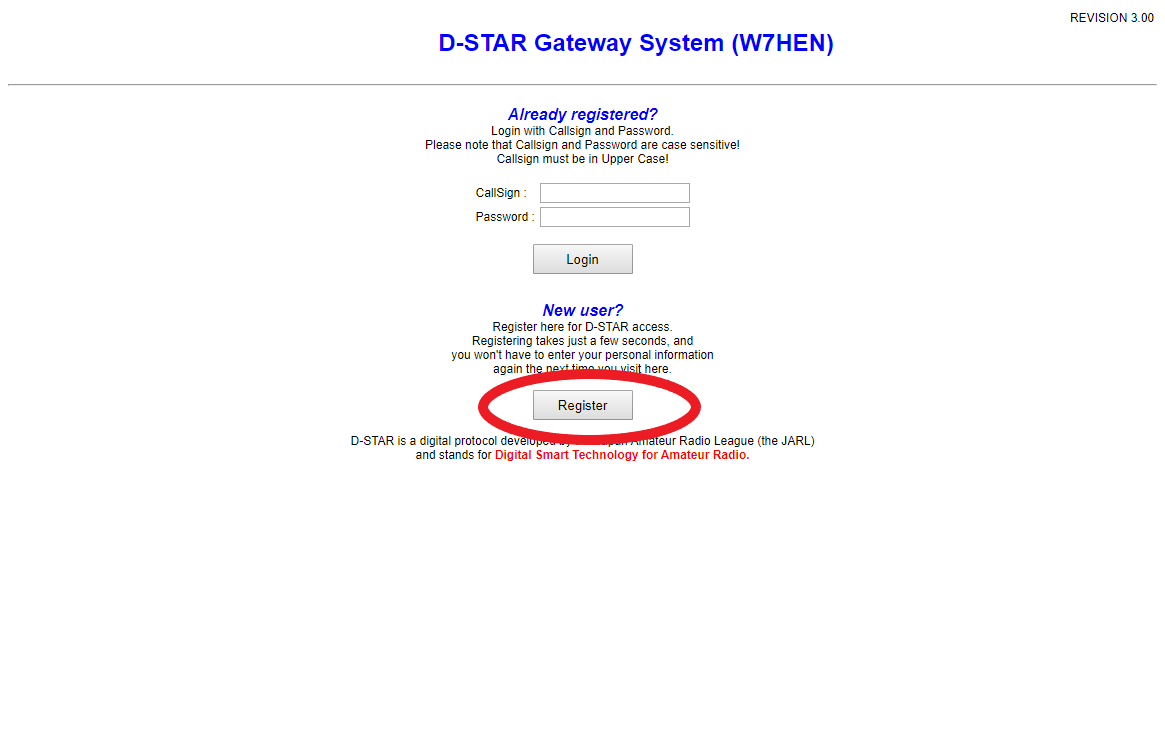
Once you click the register link it will open a new page where you will enter your call sign in all caps, your name, email address, and your password twice. IMPORTANT Before you click update, make sure that you have put a mark in the YES box that you agree to the terms of the D-Star Network. Once you click update, Lawrence has installed a script on the server that I obtained from the USTRUST admins that automatically checks every 15 minutes for new registrations. Once a new registration is found the server automatically sends me an email to approve the registration. Once registration is approved you will receive an email from me confirming your registration with the steps you need to complete your setup. As always I am available for questions if you run into issues with this part. If you would like to skip all these steps you can just email me and I will complete it for you and reply back once it is complete.
Step 3: Programming your radio
This next step varies on the type and brand of D-Star radio that you have. The information that is needed stays the same across the board. First, you need to enter your call sign in all caps into the radio, again this varies depending on brand or model of radio. After you enter your call there will be a slash “/” with four more slots. Some people enter their name if it is 4 digits or less, most of us enter the radio model, then in the text field enter your city IE: Las Vegas NV. It is more complicated-sounding then it really is, it just depends on the radio. Again, I can help with this step as I have completed it on most of the current radios for friends and club members.
Step 4: Get on the air!!
Whether you are going through one of the local repeaters or a hotspot you can now talk around the world and connect to any reflectors. If you are using the W7HEN repeater you can use the Information command, seven blank spaces with an “I” in the eighth position in the “UR” field of your radio. There is also a way to check our repeater at any time to see anyone that has used it directly within the last twenty-four hours as well as which reflector it is connected to.
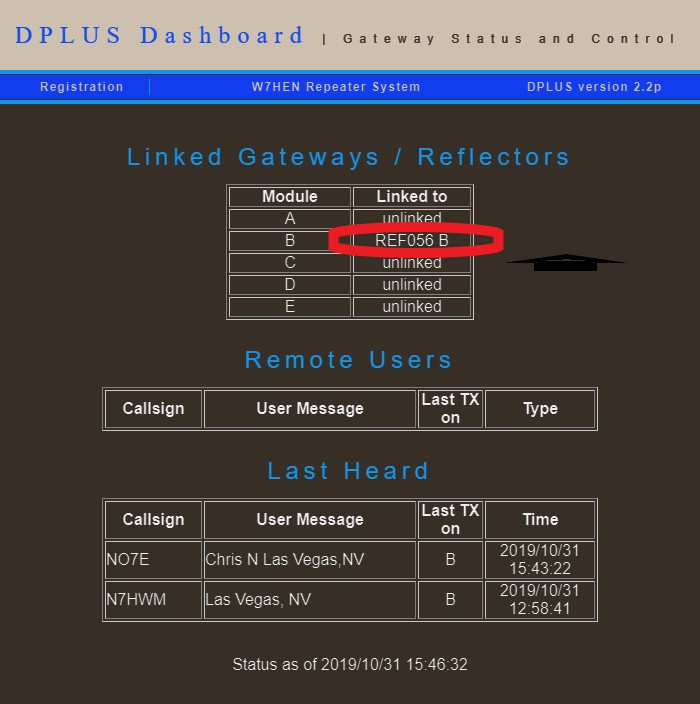
In the above picture, you can see that when I took this screenshot myself and Wayne had been on the repeater within the previous twenty-four hours. You will also notice that all slots how “Not Linked” except for “Slot B”. Our repeater is on slot “B” as a 70CM repeater designation. Slots “A, C, D, E” are not in use. As was discussed at the breakfast slot “A” is reserved for 1.2 Gig repeaters, slot “C” is reserved for 2 meters. Slots “D and E” is slow speed data 1200Bps, and for the 1.2gig high-speed data rate of 128kBps as well as connection to a built-in Reflector server. (IE: If you have your own Reflector assignment.) FCC regulations do not allow for high-speed data rates below 900MHz. Currently, there is a petition filed by the ARRL to get this increased.
Here is a link to the local NARRI repeater system dashboard.
No current information on the W7AES HXO system. They have not updated the forwarding address since the repeaters were moved. I have spoken with several of the club members and have been told that all repeaters are available for anyone to use and link as they wish. As always, with all systems please listen and do a “courtesy” check to see if anyone is using the repeater before linking or changing links.
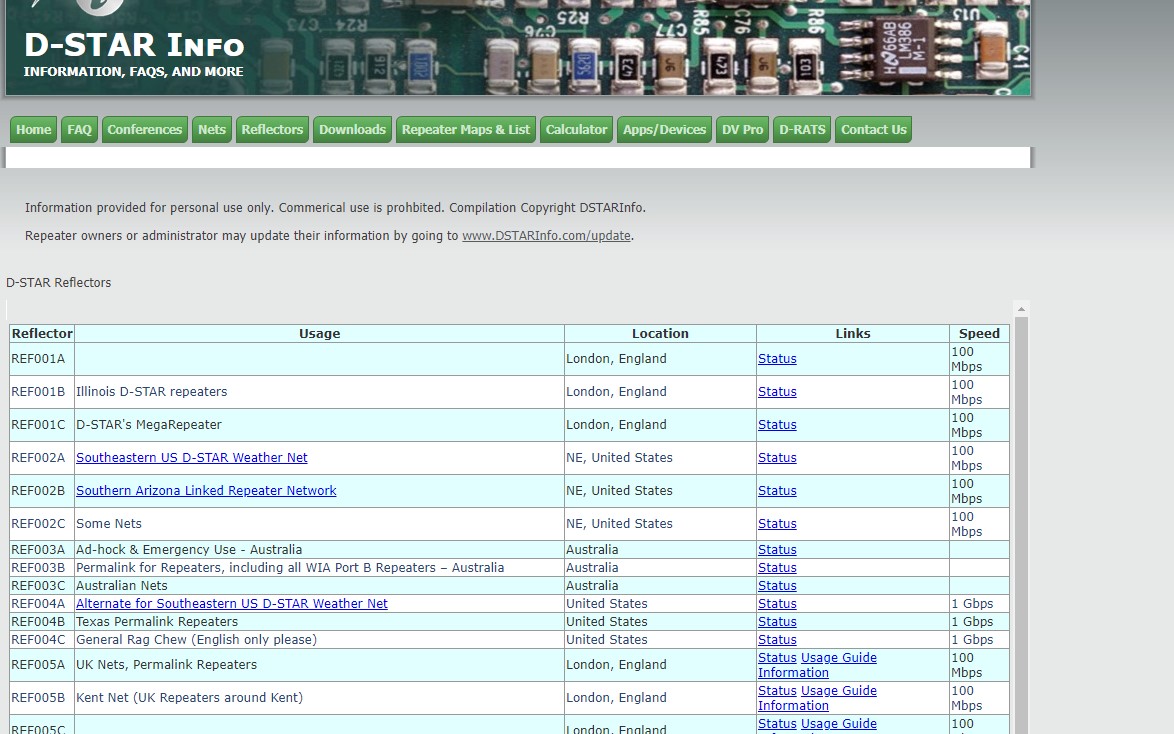
If the repeater is linked and you would like to switch to a different reflector, clink the Unlink option in your radio if you are running in the proper “DR” mode. Select the reflector you would like to link to and key the kerchunk the mic. You will get an answer back saying “Remote System Linked” unless someone is already talking then you will hear the conversation. Check this page below for information on reflectors. PLEASE STAY AWAY from linking to Emergency/ARES/RACES/Skywarn reflectors other than 14B our local use emergency reflector. There is no monitor-only function like All-Star has and if someone does not know the repeater is linked and starts to talk it might interfere with a serious situation. We want to be good citizens on the air and represent W7HEN the correct way if you would like to listen in on such emergencies check out EchoLink or Broadcastify as most have a way to listen using those methods without tying up the networks.
When you are using the W7HEN or any other repeater directly you should be using the “DR” mode on your radio. “DR” mode allows you to use the nearby repeater function that is available whether you have a GPS location active or not. You can download a current list of all active D-Star repeaters W7HEN included. “DR” mode allows you to use your radio without tying up a memory slot. Most ICOM radios have a separate set of memories for your linking, unlinking, information, and echo capabilities. This way each reflector can be used on any D-Star repeater without having to reprogram your radios each time you go to a new city, state, and or country.
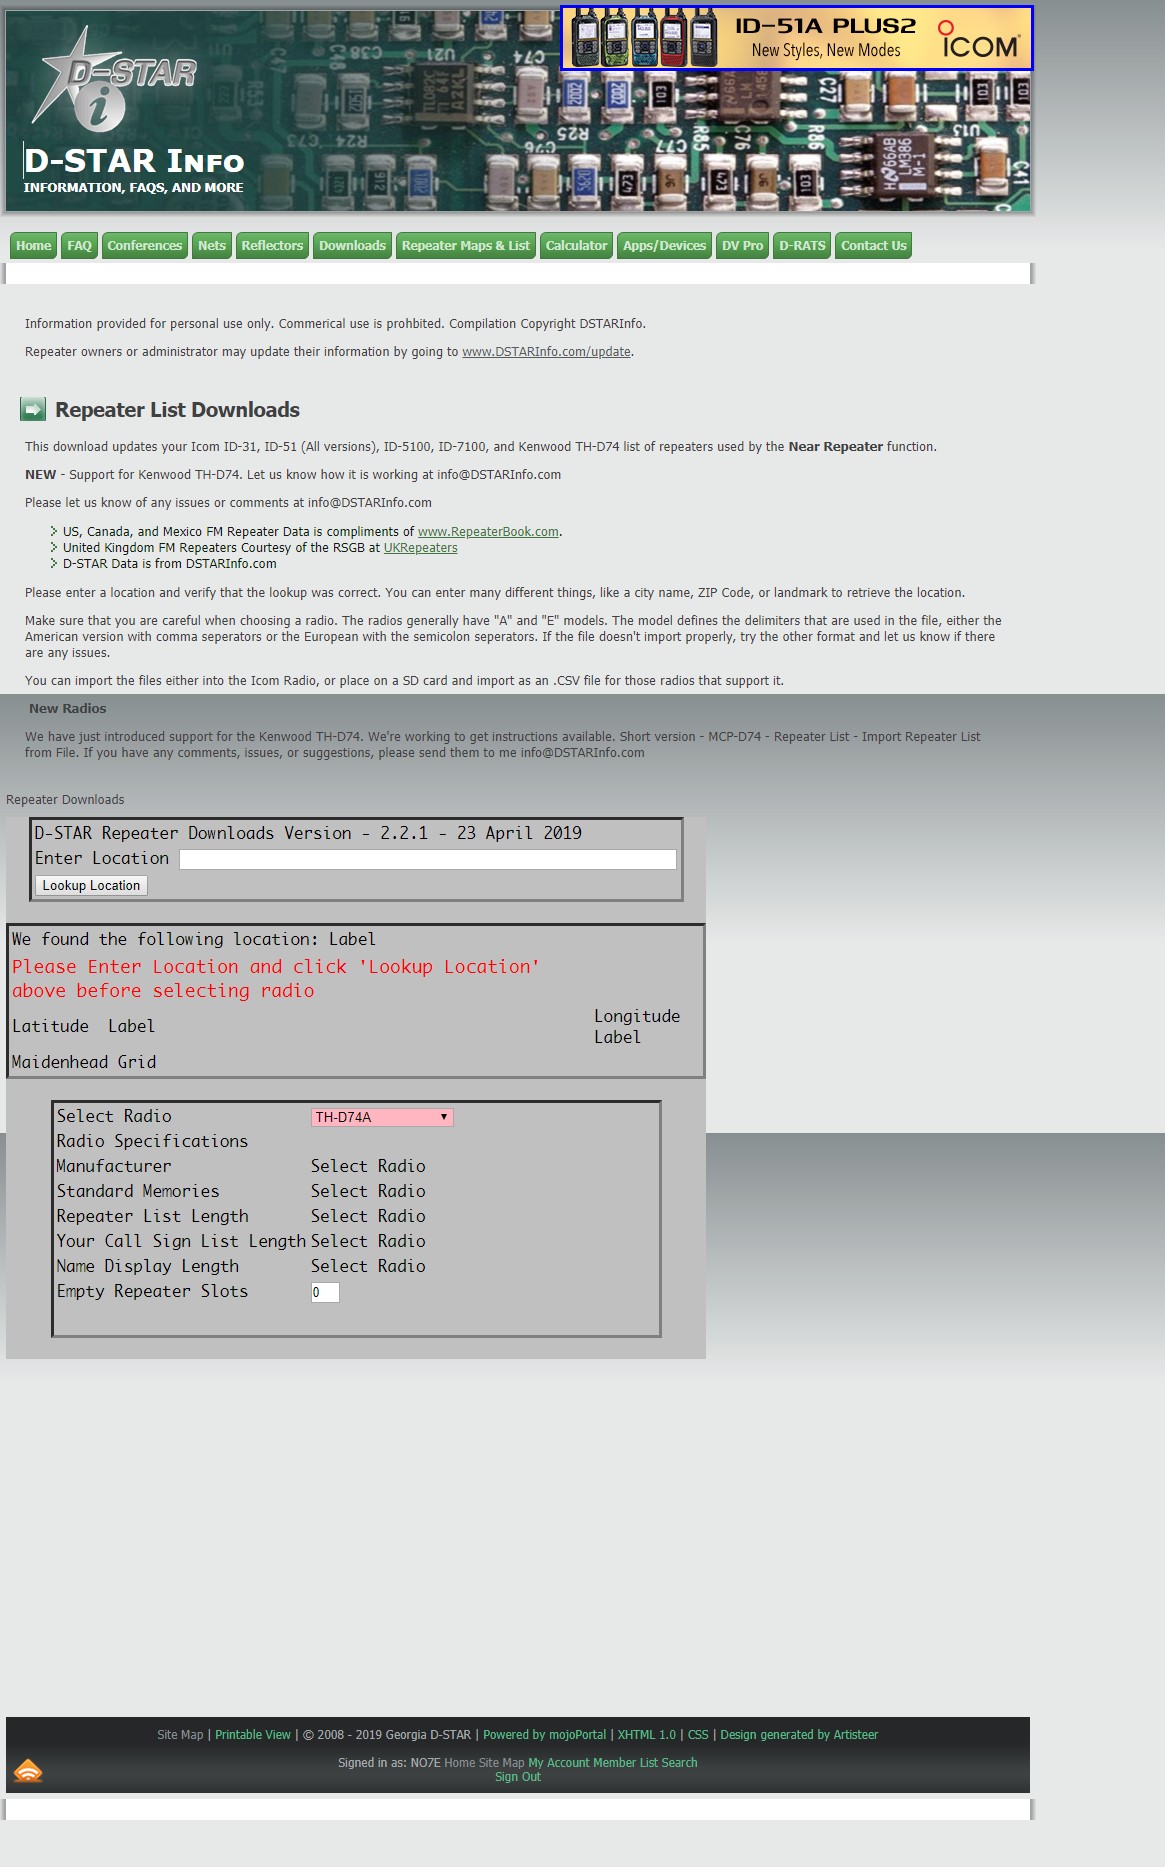
Steps for getting current “DR” mode repeater listings:
Enter your zip code (easiest way), followed by your model of radio. click download. Once you have the file put an SD card into your radio and format the card in the radio before entering it into your computer. After formatting it turn off your radio and remove the card. Put the card in your computer and move the file to the SD card in the folder that your radio manual specifies. Yes, I know real hams don’t use a manual 😎 but trust me it WILL help you.